Everything cookies & my thoughts

As I sit down to write this, it is not cookies on my mind but the rice paper rolls, the soy eggs & squash fritters from some well recognised food bloggers who are sharing their stories. These are not any story but the deepest of stories about their families & their childhood. Each one has made my heart swell & my eyes fill with tears as I think about the hardships they  & (their families) faced & the tough decisions. One thing is the same in each story – it’s about finding a safer home. Somewhere they could bring their children up without the threat or fear of violence & persecution. I urge all of you to go & have a read & remember now, while all this craziness is going on in the world that in the end we are all human & we all deserve to live without fear. #immigrantfoodstories

http://www.mydarlinglemonthyme.com/2017/02/nectarine-and-pickled-cucumber-rice-paper-rolls-vegan-gluten-free-immigrantfoodstories.html

http://honestlyyum.com/18507/

http://theyearinfood.com/2017/02/winter-squash-fritters.html

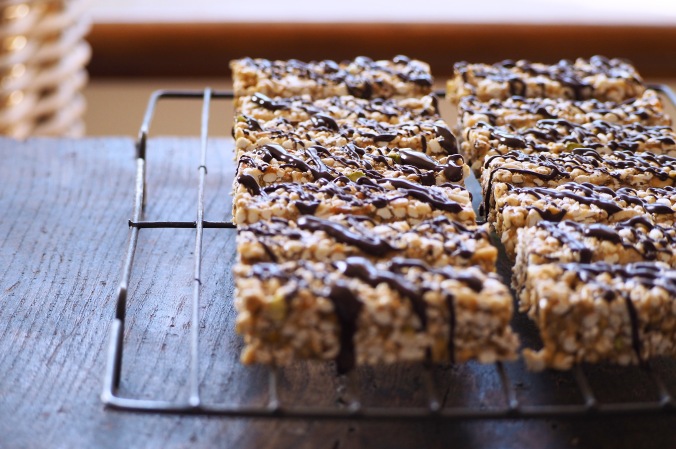
Here are some cookies that will bring a little hope & warmth into your life. They will fill you up & make you feel good.

Everything cookies 

Makes approx. 24 large cookies

Ingredients

  • 1 C whole spelt flour
  • 1 C rolled oats, plus 1/2 C extra
  • 1/4 C brown rice flour
  • 1 tsp baking powder
  • 1 tsp ground cinnamon
  • a pinch of sea salt
  • 1/4 C desiccated coconut
  • 1/2 C raw almond, roughly chopped
  • 1/2 C dried cranberries
  • 1/2 C roughly chopped dark chocolate (70% cocoa)
  • 1/2 C macadamia oil
  • 1 tsp vanilla bean paste
  • 1/4 C rice malt syrup
  • 2 over-ripe bananas

Method

  1. Pre-heat your oven to 180 degrees celcius & line 2 baking trays with baking paper.
  2. Place the 1 C of rolled oats into your blender and pulse for a few seconds to turn into oat flour. Pour into a large bowl and sift over the flours, baking powder, cinnamon & sea salt. Add the whole oats, coconut, almonds, cranberries & dark chocolate. Mix to combine.
  3. In a large jug mash the bananas then add in the oil, vanilla & rice syrup. Whisk together before pouring over the dry ingredients. Mix into a thick dough then with damp hands roll tablespoon size balls. Place onto the trays and flatten with the palm of your hand.
  4. Bake for 15 – 20 minutes, until golden. Cool for 5 minutes on the trays before transferring to a wire rack.
  5. Delicious eaten on the day otherwise will keep for up to 5 days in an airtight container.

Enjoy & spread love xx

Vegan cauliflower cheeze

img_20161211_183442

Over the last few months purple cauliflower has been popping up at all the farmers markets over here in Perth. The first time a bought one I was so excited & wanted to do something extra special. It ended up sitting in the fridge for two weeks while I dreamed up all these crazy things I could do with this purple cauliflower cauliflower. In the end I used it in a rush one busy weeknight when I was craving some comfort food. The cauliflower was roasted with garlic before being baked with a fish and creamy sauce made from almond milk. Surprisingly, it was an amazing dish that was gobbled up by all, especially my sister. She would have eaten the whole tray right then. Luckily some was left for our lunches the next day!

Since then we’ve had this cauliflower cheeze on regular rotation & every time it is thoroughly enjoyed. I’m thinking of serving this on Christmas eve and even though it’s quick & easy to make, it tastes indulgent.

img_20161211_185140

By using purple cauliflower there’s a healthy does of anthocyanins which have anti-innflammatory & antioxidant benefits. Regular cauliflower is also high in vitamin C so no matter what colour you choose its bound to be healthy & nutrient rich.

img_20161211_190636

Vegan cauliflower cheeze 

Serves 4 as a main, or 6 as a side

Ingredients

  • 2 small or 1 large head of purple cauliflower (if you can’t find it white is just as delicious)
  • 4 T extra virgin olive oil, divided
  • 2 cloves garlic, crushed
  • 1 tsp smokey paprika
  • 1/3 C chickpea (besan) flour
  • 800ml unsweetened almond milk
  • 1 tbsp white miso paste
  • 1/4 C nutritional yeast flakes, plus 2 tbsp
  • 1/2 C walnuts, roughly chopped
  • 2 tbsp sunflower seeds, roughly chopped

Method

  1. Preheat the oven to 200 degrees celcius.
  2. Trim the cauliflower & cut into medium sized florets.
  3. Line a baking tray with baking paper & place the cauliflower on in a single layer. Drizzle with 2 tbsp of the olive oil, sprinkle over the crushed garlic, paprika & season with salt & pepper. Place into the preheated oven for 20-25 minutes.
  4. Meanwhile prepare your béchamel sauce by heating the remaining 2 tbsp of olive oil in a small saucepan. Add the chickpea flour and stir until a thick paste forms. Now, with a whisk in hand, gradually add the almond milk, whisking continually to ensure no lumps. Over a medium heat gently bring to the boil, while whisking every so often. It will take about 10 minutes for the sauce to thicken.
  5. Once thick add in the miso & nutritional yeast. Give the sauce a final whisk before taking off the heat.
  6. Remove the cauliflower from the oven & place in a baking dish. Pour over the béchamel sauce & top with the walnuts, sunflower seeds & remaining nutritional yeast. Season with a little extra salt & pepper & baking at 200 degrees celcius for 30 minutes.
  7. Serve with a crisp green salad.

img_20161211_185400

Enjoy!


Cacao & avocado shakes

It’s that time of year again when my parents avocado trees are dripping with fruit and the local markets are full of gorgeous avo’s ready for the picking. I’ve been filling my bag with them at the markets, for a very decent price, and I can’t wait for my parents visits when (hopefully) they come with arms full of them. Of course, nothing beats the simple avo on toast combination , and I can’t go past that. But when I have so many I look to other ways of including them in my diet. Smoothies are one of my favourite things and I don’t think a day goes by when I don’t have one. So it’s no wonder that the avo’s have ended up in my smoothies. They are perfect in a vibrant green smoothie, with lots of kale, mint, lemon and cucumber, adding a very welcome creamy texture.

Today I mixed it up with a very decadent shake, using the avocado to make the drink extra thick and creamy. This is the perfect breakfast treat or dessert. It’s packed with the goodness of raw cacao for that rich chocolate flavour, mesquite adds a lovely hint of caramel and is a good source of calcium & potassium as well as stabilising blood sugar levels and of course the hero avocado is high in vitamin K and healthy monounsaturated fats.

Cacao & avocado shakes 

Serves 2

Ingredients 

  • 1 large frozen banana
  • 1/2 large avocado
  • 2 ice cubes
  • 2 sprigs of mint
  • 2 tbsp cacao powder
  • 2 tsp mesquite powder
  • 2 tsp almond butter
  • 2 medjool dates, pitted
  • 2.5 C unsweetend almond milk

Method

Place the banana, avocado flesh, ice, mint cacao powder, mesquite powder, medjool dates & almond milk into a high speed blender. Blend for 1 minute or until thick & creamy. Pour into 2 glasses and top with an extra sprinkle of cacao & a few cacao nibs. Drink immediately.

Chewy chocolate bars

OLYMPUS DIGITAL CAMERA

Imagine crispy puffs of quinoa and buckwheat, crunchy peanut butter, creamy tahini, a hint of sea salt and dark chocolate all rolled into one bar. It’s the chocolate bar of my dreams. And now I can have it everyday because, really, it’s not as unhealthy as you might think. Puffed quinoa and buckwheat are both nourishing seeds, which makes them gluten frees, and they are packed with protein and calcium. So we’ve got a chocolate bar that’s both delicious and nutritious!

A little peanut butter and tahini are also great sources of protein and healthy fats, which will help keep you full for longer. These really are the chocolate bar you should be reaching for when the 3pm slump hits. That’s exactly what I’m doing now, along with a big cup of tea. It’s the perfect post tennis treat.

I also made these for my parents last weekend and they thoroughly enjoyed them. Especially my Dad. Now that the recipe is up, my mum might even make them for him!

OLYMPUS DIGITAL CAMERA


Don’t be shy with your pinch of sea salt as it really lifts these bars to the next level. Also, feel free to add whatever nuts or seeds you have on hand instead of the pistachios and almonds. Of course, these bars can also be made vegan by using an alternative sweeter such as rice malt syrup or maple syrup, however I truly love the taste of a beautiful floral honey. 

OLYMPUS DIGITAL CAMERA

Chewy chocolate bars

makes 16

  • 1 1/2 C puffed quinoa
  • 1 1/2 C puffed buckwheat
  • 1/4 C flaked almonds
  • 1/2 C pistachios, roughly chopped
  • 1/4 C chia seeds
  • 1/2 C honey
  • 1/4 C natural peanut butter
  • 1/4 hulled tahini
  • 40g drak chocolate (70% cocoa solids minimum)

method

  1. Combine the puffed quinoa, puffed buckwheat and chia seeds in a large bowl. Set aside.
  2. In a heavy based pan, gently toast the almonds and pistachios over medium heat for about 5 minutes.
  3. Combine the honey, peanut  butter and tahini in a small saucepan and stir over low heat until combined.
  4. Add the toasted nuts and tahini mixture to the puffs, quickly mix to combine.
  5. Press into a lined lamington tin (30 x 15 cm), you may need to wet your palms slightly to prevent the mixture sticking to you.
  6. Refrigerate for about 4 hours, or until set firmly.
  7. Remove from the fridge and slice into even sized bars. Gently melt the dark chocolate then use a small spoon to drizzle it over each bar. Pop them back into he fridge for the chocolate to set. Serve, or store in an airtight container in the fridge for up to 1 week.

enjoy!

Greenalicious pasta

Hey friends! After a very long drought from food blogging I am finally back with a new recipe. This is for all those thoughtful people who have been telling me how much they love my blog & recipes – so i’ve come back feeling very inspired to keep getting recipes out to you all! Hopefully with a little more regularity. I wouldn’t put the lack of posts down to me not cooking so much, but rather not having enough time to take all the photos and write up the recipe. I certainly have still been busy in the kitchen, making lots of hearty soups, curries (inspired by my trip to Sri Lanka – a post on that to come soon), lentil pies, warm salads and pasta. This pasta recipe in particular has been on regular rotation in our home, due to its simplicity, deliciousness and the fact that my boyfriend would eat pasta every night if I let him!

What has been keeping me busy is some very tricky chemistry units at university (who would have thought there was so much chemistry involved with Nutrition!?) and a new part-time job as a cook! So after spending most the morning cooking when I get home I just want to gobble up my food without even a thought about taking a photo.

Anyway, here it is. I hope you enjoy this dish as much as my family and I do, and that it might just become a delicious family staple. Plus, it’s super good this time of the year with all the garlic and kale to keep your immune system strong.


Greenalicious Pasta

Serves 4, vegan & gluten free options

  • 375g wholegrain penne pasta (I use spelt or buckwheat)
  • 200g baby kale leaves, washed
  • 4 garlic cloves, peeled
  • 1/4 C local extra virgin olive oil
  • 1 large head of broccoli or romanesco, cut into florets
  • 1/2 C walnuts, toasted in a dry pan, roughly chopped
  • Sheeps milk romana or nutritional yeast, to serve

Method

  1. Bring a large pot of water to the boil. Once boiling add your kale and garlic. blanch for 2-3 minutes, until a vibrant green, no longer.
  2. Scoop out the kale and garlic and place in a blender with the oil. Add 1/4 – 1/2 C of the cooking water. Season with sea salt and black pepper. Blend until a super smooth, pourable consistency, adding more water if necessary.
  3. Meanwhile, pop the pasta in the pot of boiling water. 5 minutes before the pasta is due to be ready (according to packet directions) add in the broccoli florets. Continue to cook until the pasta is al dente. The broccoli should be just soft.
  4. Drain and stir through the blended kale sauce. Serve with the toasted walnuts and a little romano cheese or nutritional yeast. A drizzle of good EVOO is a nice addition too.

Show me your greenalicious pasta on Instagram by tagging #goodnessgraciouskitchen

Heartwarming porridge

1464226269411
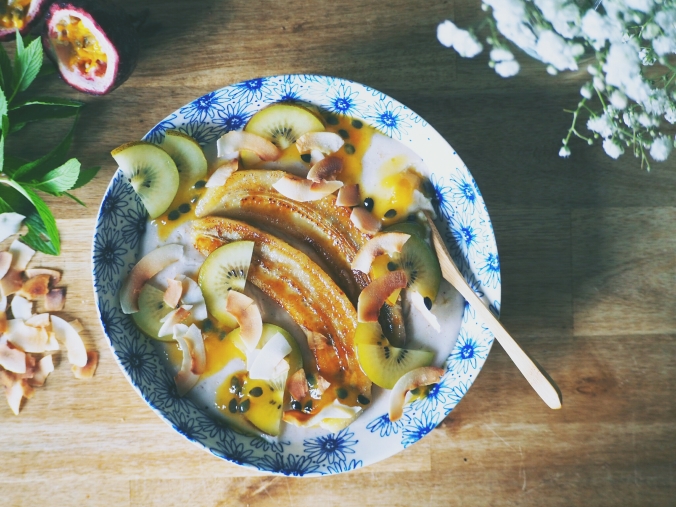
The last few days of Autumn are shining upon us which means my breakfasts have started to heat up. On the mornings when I don’t have to eat my breakfast post yoga & in the car, I enjoy beautifully creamy, warm oats with an assortment of toppings. Lately we have been getting the last of the passionfruit from my parents vines, lots of bananas at the markets and the first of my favourite golden kiwifruit. These make the most delightful topping on creamy coconut porridge.

1464340371184

I’ve got one more week left of this semester at University then a couple of weeks of exams.  After that, my boyfriend, my parents and I will be packing our bags and heading to Sri Lanka! I’m beyond excited and can’t wait to swim in the warm ocean, walk through some splendid tea plantations and feast on fragrant curries. We’re heading through the hill country then to the east coast. I would be forever grateful if any of you have some travel advice and must see/do places. I’m also hoping to do an Ayurveda cooking class, so any information about that would be most welcome.

Anyway here is a beautifully warming porridge recipe with a little tropical inspiration.

1464340552389

Creamy Coconut Porridge 

Serves 2-3

Ingredients

  • 1 C rolled oats (gluten free if necessary), soaked overnight
  • 1 C coconut milk
  • 1 tsp vanilla powder
  • 1 tsp cinnamon
  • 1/2 tsp ground cardamon
  • 3 passionfruit, pulp scooped out
  • 2 bananas, sliced lengthways
  • 1 tsp coconut oil
  • 1 tsp coconut sugar
  • 1 golden kiwi fruit, thinly sliced
  • 2 tbsp coconut flakes, toasted
  • Coconut milk, extra to serve
  • Coconut syrup (the sap from the coconut palm), to serve

Method

  1. Soak the oats overnight in a generous amount of water. Drain in the morning and place in a small saucepan along with the coconut milk and 1 C of filtered water.
  2. Place the saucepan over very low heat and add the vanilla, cardamon and cinnamon. Bring to a low simmer and stir for 5-10 minutes or until thick and creamy.
  3. While the porridge is cooking, heat the coconut oil in a small frypan. Sprinkle the sliced bananas with coconut sugar before placing cut side down in the pan. Cook for 2-3 minutes, until golden. Flip and cook the other side for 1 minute before turning off. Set aside.
  4. When the porridge is ready pour into your serving bowl and top with the caramelised bananas, passionfruit pulp, kiwi and coconut flakes. Serve with extra coconut milk and coconut syrup.

Enjoy!

Warm cauliflower and aubergine salad

Cauliflower has officially made a come back. Its no longer that plain, overcooked until watery vegetable but rather the hero of so many different dishes.  We’ve seen it as pizza bases, a rice alternative, in cakes, in bread and of course flavoursome soups. But my favourite way has got to be roasted until the edges are charred and crispy and the inside still has a little bite. Here it is roasted with turmeric, cummin and cinnamon which lifts the mellow flavour of the cauliflower while also adding a little sweetness.

Now don’t get me started on eggplant because it is quite possible one of my favourite things now after years of hating it as a kid. Roasting, like the cauliflower has got to be my favourite way to cook it. Once again the edges get crispy and charred but the inside is buttery soft and so delicious.

I’ve paired these two beautiful vegetables with green lentils, lots of fresh parsley, sweet dates, tangy pomegranate jewels and a creamy tahini dressing to really create a satisfying salad that is perfect for any day or night.

Warm cauliflower and aubergine salad

serves 4 as a side or 2-3 as a main 

  • 1/2 large head of cauliflower, cut into small florets
  • 1/4 C extra virgin olive oil
  • 1 tsp turmeric powder
  • 2 tsp cummin seeds
  • 1 tsp ground cinnamon
  • 1 aubergine, sliced into wedges
  • 1 tsp chilli flakes
  • 1 tsp smokey paprika
  • 1/2 C green lentils
  • 1 bunch parsley, finely chopped
  • 1/4 of a preserved lemon, finely chopped
  • 2 C baby spinach leaves
  • 5 medjool dates, roughly chopped
  • 1/4 c raw almonds, roughly chopped
  • pomegranate jewels, to serve
  • tahini dressing, to serve (recipe below)

Method

  1. Preheat the oven to 180 degrees celsius. Line two baking trays with baking paper. Toss the cauliflower florets with 1/2 the olive oil, the turmeric, cumin and cinnamon. Spread out on the baking tray and place in the preheated oven for 30-40 minutes.
  2. Slice half way down along the wedges of aubergine, making sure not to cut all the way through. place on the other baking tray and drizzle with the rest of the oil, the chilli flakes and paprika. Place into the oven for 30 minutes, or until charred on the edges and soft and gooey on the inside.
  3. Rinse the lentils before placing in a saucepan and covering well with lots of water. Bring to the boil over medium heat before turning to low, covering and cooking for 20 minutes. Refresh under cold water and set aside.
  4. Combine the cooked lentils, roasted cauliflower, parsley, baby spinach and preserved lemon in a large bowl. Add the roasted aubergine on top followed by the almonds, pomegranate jewels and spicy tahini dressing.
  5. Serve immediately.

Spicy tahini dressing 

makes 3/4 C 

Ingredients 

  • 1/4 C tahini
  • 1 clove garlic, crushed
  • 1 lemon, juiced
  • 1 tbsp extra virgin olive oil
  • 1/2 tsp chilli flakes
  • 1 tsp raw honey
  • salt and pepper to taste
  • water, to thin, about 3/4 c

Method 

  1. Place everything but the water in a bowl and stir to combine. Slowly add the water until the desired consistency is reached. Its nice to have it quite runny so its a good drizzle consistency.
  2. Use for the salad and store any leftovers in the fridge for up to 5 days.

Enjoy!


Vanilla cream cake with seasonal fruit

OLYMPUS DIGITAL CAMERA

This may sound like a totally indulgent and luxurious dessert but really its not so bad for you at all! The ‘cream’ filling is made from raw cashews and coconut milk which is fluffy and flavoursome and so much better for you than a regular cream filling! Along with a nut base and fresh seasonal fruit on the top it’s the perfect guilt-free treat. My mum has been going all out and taking a slice for her morning tea at work, piled high with sweet figs and tangy passionfruit it’s the perfect morning indulgence. It would also be beautiful on an afternoon high tea platter.

The cream cake filling is scented with vanilla beans and raw local honey which adds not only sweetness but floral fragrances making it the perfect backdrop for whatever seasonal fruit you have on hand. I have chosen figs and passionfruit as our garden is bursting with them both at this time. Plus, the sweetness from the figs and tang from the passionfruit work beautifully together. I would also say mango and raspberries would be a delicious topping. Strawberries, kiwifruit, peaches and even cherries. Choose whatever fruit you have available in abundance and by doing this you will be getting the tastiest option. Sprinkle a few little mint leaves on top and you have a picture perfect and flavour packed treat!

For the base, I have chosen to use mainly buckwheat groats as these make the dessert a little lighter, there’s only so many nuts we can have, right?! But by including a few walnuts the base still has a delicious nutty flavour and is packed with nutrients.

OLYMPUS DIGITAL CAMERAOLYMPUS DIGITAL CAMERA

Notes about the recipe

I like to make the cream cake and place it sliced in a tupperware in the freezer without adding the topping. This way it will last up to 1 month frozen. Before serving I simply remove the desired amount of slices 30 minutes prior and top with the fresh fruit topping. 

To achieve a really creamy filling it is best to use a high speed blender, such as a vitamix. 

Vanilla & honey cream cake with seasonal fruit 

makes approximately 16 slices

Ingredients

for the base

  • 1/2 C raw walnuts
  • 3/4 C buckwheat groats (buckinis)
  • 1/2 C shredded coconut
  • 8 fresh dates, pitted
  • 4 dried figs
  • 2 tbsp virgin coconut oil
  • a pinch sea salt
  • 1 tsp ground cinnamon

for the cream filling

  • 2 C raw cashews (soaked overnight)
  • 1/2 C full fat coconut milk
  • 2 T raw honey (or maple syrup)
  • 1 tsp vanilla bean powder
  • 2 tbsp coconut oil

for the topping (choose whatever locally grown, seasonal fruit you have available)

  • 1 C sliced fresh figs
  • 4 passionfruit, pulp only
  • a few fresh mint leaves
  • edible flowers to decorate, if desired

Method

  1. Start but soaking your cashews overnight or for at least 6 hours.
  2. For the base, place the walnuts, buckwheat and coconut into a processor and blitz for about 1 minute, or until a rough crumbly textures is achieved. Add the dates, dried figs, coconut oil, sea salt and cinnamon before processing again until a sticky texture.
  3. Press this mixture firmly into a lined 20×30 cm tin. Place into the freezer.
  4. For the cream filling, drain the cashews and place in a high speed blender along with all the other filling ingredients. Blitz for 2-3 minutes or until a VERY creamy texture is achieved. Check the balance of flavours as you may need to add a little more honey if you’ve got a sweet tooth.
  5. Pour the filling over the base and place back into the freezer to set for 4-6 hours. Once completely set slice into 16 bars. If serving now top with fig slices, passionfruit pulp and mint leaves and let sit for 30 minutes to thaw.
  6. Otherwise store the slices in the freezer for up to 1 month.

Enjoy!

Show me your creations by tagging #goodnessgraciouskitchen on Instagram xx


Cacao & Ginger energy bars

University goes back today, school has been back for a few weeks and I’m sure most of you have been back at work for at least the last month. For me, this means long days at uni filled with chemistry labs and the need something delicious and energising to keep me sustained. I have previously posted the recipe for my Nutty fruit cake, which is a great snack while you’re on the run and is often found in hanging around the bottom of my bag. These bars are another delicious snack and with the addition of cacao which is full of antioxidants, magnesium and iron they really will give you a boost.

I must admit though that these energy bars don’t travel nearly as well as the indestructible Nutty fruit cake however they are just as delicious enjoyed at home with a big cup of tea or a glass of fresh nut milk. Filled with the rich taste of cacao and spicy ginger these are the big kid addition of a chocolate bar so if you want to make them for some little people reduce the ginger and perhaps addd a little honey for a sweeter version.

Cacao & ginger energy bars

makes 16 bars

Ingredients

  • 2 C rolled oats, gluten free is necessary
  • 1/2 C pumpkin seeds (pepitas)
  • 1 C pitted dried dates soaked in just boiled water for 10-20 minutes
  • 2 C puffed quinoa or millet
  • 2 tbsp raw cacao powder
  • 1- 2 pinches flaky sea salt
  • 3/4 C tahini
  • 4 tbsp coconut oil
  • 1 tbsp  freshly grated ginger

Method

  1. Preheat your oven to 180 degrees celsius. Place the rolled oats and pumpkin seeds on a baking tray and pop it into the oven for 10-15 minutes or until the oats are just golden and smelling delicious.
  2. Meanwhile, line a 20x30cm lamington tin with baking paper and set aside. Drain the dates, place in a small bowl and mash with a fork into a sticky smooth paste. Add in the tahini, coconut oil and ginger, mixing to combine.
  3. In a large bowl mix the puffed quinoa, cacao powder and sea salt. Add in the toasted oats and pumpkin seeds.
  4. Finally spoon over the date/tahini mixture and mix quickly to combine.
  5. Spread the mixture evenly into the prepared tin and press down firmly with your palm. You may want to wet your hands very slightly to stop the mixture sticking to you!
  6. Place in the fridge to set for about 4 hours before slicing into bars.


Raw banana crepes

OLYMPUS DIGITAL CAMERA

A few weeks ago I had the most divine breakfast at a beautiful cafe in Perth called The little shop of plenty. They had raw banana crepes on the menu and I knew right away i had to taste them! They were nothing like traditional crepes but absolutely delicious in their own way. Since then, I have had them on my mind and when we had some over ripe bananas hanging around I knew the time was perfect. Plus, it was a Saturday night when I started so I couldn’t resist the thought of waking up to a slow Sunday morning with raw banana crepes!

I have flavoured the crepes with a little cinnamon as it always goes so perfectly well with banana and adds another dimension of sweetness. It’s also loaded with antioxidants and anti-innflamatory properties, so win win! We then filled the crepes with beautiful fresh figs and passionfruit from our garden, coconut cream, a little mint and some raw honeycomb my Dad collected from the bees. It was a sensational combination and I urge you to try it! Otherwise the crepes are delicious with whatever seasonal fruit is available or even almond butter and honey. Let you imagination run wild!

OLYMPUS DIGITAL CAMERA

Notes about the recipe 

You will need a dehydrator to make the crepes. I have a large sunbeam one which wasn’t too expensive and does the job well. The time will depend on your dehydrator settings but as stated in the recipe mine took 4.5 hours at 70 degrees celsius.

This isn’t your regular cope so don’t expect anything fluffy and light. Rather these are chewy in texture and really quite filling.

OLYMPUS DIGITAL CAMERA

Raw banana crepes

Serves 3-4  

Ingredients 

  • 4 ripe bananas, peeled
  • 1 tsp ground cinnamon
  • 1 tbs chia sees
  • 1/4 C filtered water
  • To serve: fresh figs, passionfruit, coconut cream, honey comb, mint and edible flowers. Feel free to use any seasonal fruit you have available. 

Method

  1. Place the bananas, cinnamon, chia and water in a high speed blender and pulse until very smooth and creamy.
  2. Pour 1/4 C onto a lined dehydrating tray and move the tray in a circular motion to evenly spread the mixture into a circle. Repeat until all the mixture is used.
  3. Dehydrate at 70 degrees celcius for 4.5 hours, or until dry and not sticky.
  4. Gently peel off the baking paper. The crepes will keep in an airtight container with paper between each one for up to 1 month.
  5. To serve slice the figs and scoop out the passionfruit pulp. Fill the crepes with the figs, passionfruit, a drizzle of coconut cream, a little honeycomb a few mint leave and  edible flowers. Roll up and enjoy the beautiful fresh flavours!

Enjoy! Show me your crepes on Instagram @goodnessgraciouskitchen #goodnessgraciouskitchen